Tuesday, March 13, 2012

23h47m_13March2012

Oops, I see some moss in my blog :). Long time no writing.

Well, it's my intention to write an entry about my list of computer science books with specialism on system and computer network for a long time. Of course, I don't have enough time to crunch and digest all the books in this list, but all of them are considered and surveyed carefully by myself. Computer science was not my major when I were a student but telecommunication, thus I have to read many books and materials to fill out a plenty of gaps in my knowledge in this field. And, it is my habit to make a cautious choice each time I need to read a new subject in computer science, because I don't want to waste my time for an inappropriate book. Hope that this list will be useful for someone like me.

1. Programming
The C programming language, by Brian Kernighan and Dennis Ritchie
The C++ programming language, by Bjarne Stroustrup
Effective Java, by Joshua Bloch
Code complete, by Steve McConnell
Dive into Python, by Mark Pilgrim

2. Analysis and design
Design patterns - Elements of reusable object oriented software, by Gang of four
Pattern-Oriented Software Architecture (5vol), by Douglas Schmidt
Documenting Software Architecture - views and beyond, by Paul Clements, et al
UML Distilled, by Martin Fowler

3. OS and system
Modern operating systems, by Andrew Tanenbaum
Linkers and loaders, by John Levine
Computer systems - A programmer perspectives, by Randal Bryant and David Hallaron
Advanced programming in the UNIX environment, by W.Richard Stevens
Programming with POSIX thread, by David Butenhof

4. Networking
UNIX Network programming vol1 -  The sockets networking API, by W.Richard Stevens
UNIX Network programming vol2 - Interprocess communication, W.Richard Stevens
Computer networking, a top down approach, by James F.Kurose and Keith Ross
TCP IP Illustrated (3 vol), again by W.Richard Stevens
Communication networking - An analytical approach, by Anurag Kumar, et al

Some lines of description and may be downloaded link will be added soon :-/
My two cents,

Friday, November 19, 2010

SIP over TCP and UDP

1. With TCP
- Sender: SIP message is not limited in its size. When user calls system call to send SIP message, this message can be divided into more than 1 TCP segment depending on window size of receiver. Each TCP segment then can be fragmented to more than one IP packets by IP layer. This fragmentation is necessary for sending data through link layer with a particular MTU.
For eg, i want to send 4kB SIP message, so i call send() with input is buffer of this message. The message will be splitted to 2 TCP segments depend on window size at receiver: segment 1 with size of 2,1kB and segment 2 with size of 1,9kB. Then say i use Ethernet interface with MTU is 1500 bytes, so segment 1 is divided into 2 fragments: fragment 1 has size of 1kB, fragment 2 has size of 1,1kB. The same step with segment 2, it will be divided into 2 fragments: one with 1kB and one with 0,9kB. Totally we have 4 IP packets sent through Ethernet interface.

- Receiver: IP layer is in charge of reassemblying IP packets to reproduce the TCP segment. So IP layer returns to transport layer (here is TCP) TCP segments correspond to TCP segments sent from sender.
Kernel then saves that data to kernel's buffer and notify to user by returning recv() or read(). Because a SIP message may be sent used more than 1 segments, receiver may be need to call more than 1 read() to receive all message. So receiver need to check data each time read() return to know the end of message is reached or not.
Return to former example, receiver's IP layer reassembles 2 first packets to reproduce first TCP segment,
then save its data to kernel's buffer. read() then returns to user that data. So user need to check whether he receives all message content or not. If not, he continues calling to read(), wait for second TCP segment come and then check it.

2. With UDP
UDP is datagram protocol, so each time sender call send() or write() with input is buffer to SIP message,
all that SIP message will be contained in UDP datagram before can be fragmented at IP layer. At receiver side, it just calls recv() or read() one time to receive all message. It means that the number of calls to send() at
sender is the same with the number of calls to recv() at receiver.

But unlike TCP, UDP has a limitation in size of data it can transport. So we just can send SIP message with
maximum size of 64kB. And another problem with UDP is if UDP datagram is fragmented by IP layer and any one of these packets lost, receiver has no way to receive all message. So with UDP it is recommended to send SIP message with size lower or equal to (MTU - UDP header - IP header).

Tuesday, November 2, 2010

Pantheios logging library - basic

This article's intended to describe briefly about how to build and use logging library Pantheios

Section 1: build Pantheios
Having built-Pantheios on your system is quite easy. You just need to get Pantheios and Stlsoft from Internet. You can download them from http://pantheios.sourceforge.net/downloads.html . Then extract them. Stlsoft is only-header file library so you don't need to build it. The other one, Pantheios otherwise need to be built. Assume that two directory that you extracted Pantheios and Stlsoft are "/home/username/pantheios-1.x.x" and "/home/username/stlsoft-1.x.x". Now you need to build Pantheios. All makefiles for different compilers (GCC, Visual C++, Intel ...) are contained in pantheios-1.x.x/build. With my compiler, GCC 4.2, i will use makefile from "pantheios-1.x.x/build/gcc42.unix/".

In order to build all components including core, examples and test, use: make build.
In order to build just core libs, use: make build.libs.core.
In order to build test components, use: make test.

After running makefile, all libraries reside in pantheios-1.x.x/lib, all executable files reside in pantheios-1.x.x/bin and pantheios's header files still be in pantheios-1.x.x/include.
Next step is to set environment variable for Pantheios and Stlsoft. You set FASTFORMAT_ROOT environment variable to pantheios-1.x.x
folder (in this example is /home/username/pantheios-1.x.x) and STLSOFT environment variable to stlsoft folder (here is /home/username/stlsoft-1.x.x)
With bash shell, you can type: export FASTFORMAT_ROOT='/home/username/pantheios-1.x.x' and export STLSOFT='/home/username/stlsoft-1.x.x'. Otherwise with C shell (csh, tcsh), you use: setenv FASTFORMAT_ROOT /home/username/pantheios-1.x.x and setenv STLSOFT /home/username/stlsoft-1.x.x.
OK, now you've already had ready-to-use logging tool. Next section is about how to use Pantheios logging library

Section 2: use Pantheios
Before using Pantheios, you should catch overview in architecture of Pantheios. Well, Pantheios is comprised by 4 components: application, core, front end and back end component.
- Application component provides user with APIs for logging, such as log_INFORMATIONAL(), log_DEBUG(), log_NOTICE(), log_WARNING(), log_ERROR(), log_CRITICAL(), log_ALERT(), log_EMERGENCY() (8 types of function). Beside, there are classes named inserter classes for handling data types, such as integer, pointer, real and other extent types.

- Core component is called by application component and is in charge of implementing functionalities. Core component is the one that don't need
user's implementation. On the other hand, the two last components take you more attention.

- Front-end component can be imagined as configuration items where process identity and severity level will be determined. For example, if you use on-stock front-end library "fe.simple", you could log with all severity levels except INFORMATIONAL and DEBUG levels ( correspond to log_INFORMATIONAL() and log_DEBUG() function ) or if you use on-stock front-end library "fe.all", you can log with all 8 log functions above.
User can use on-stock front-end libraries or write one by himself freely.

- Back-end component is a component which transport log statement to properly output like standard output (stdout/stderr), file, syslog ... This component is the last part in processing sequence of Pantheios. Just like front-end library, you can use on-stock back-end libraries or
implement one.
We can summarize processing sequence like this


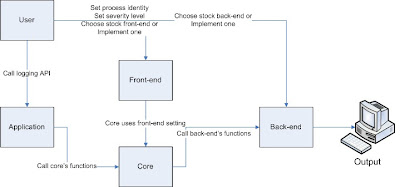
Front-end and back-end component define required interfaces so any implementation of front-end or back-end must implements that interfaces.
Front-end requires 4 functions: pantheios_fe_init(), pantheios_fe_uninit(), pantheios_fe_processIdentity(), pantheios_fe_isSeverityLogged().
If you use stock front-end library such as fe.simple, these functions are implemented in that library (pantheios.1.fe.simple.gcc42.a if you use Linux and GCC 4.2) and ready to use. Otherwise, if don't like available libraries, you can write one by implementing these 4 functions.
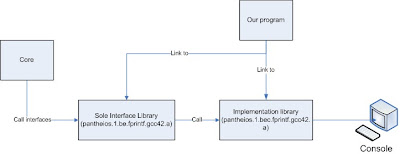
Back-end requires 3 functions: pantheios_be_init(), pantheios_be_uninit(), and pantheios_be_logEntry(). In this article i just consider about using stock back-end, so assume that we want to log to console, then we will use be.fprintf back-end library. be.fprintf library defines 3 required functions by calling other 3 specific functions that are particular to logging to console. That 3 called functions are inside bec.fprintf library (in Pantheios, libraries like be.fprintf named Sole Interface Library and libraries like bec.fprintf named Implementation Library ). With this model, core component just need to know required interfaces and specific back-end or front-end can be plugged easily.
Now we link our program to both lib: be.fprintf and bec.fprintf ( pantheios-1.x.x/lib/pantheios.1.be.fprintf.gcc42.a and pantheios-1.x.x/lib/pantheios.1.bec.fprintf.gcc42.a in my case ) and it will log to console.


Section 3: example
Here is simple example


#include "pantheios/pantheios.hpp" //primary header file, always be included
#include "pantheios/frontends/stock.h"

//Specify process identity
const PAN_CHAR_T PANTHEIOS_FE_PROCESS_IDENTITY[] = "test.exe";

int main(int argc, char** argv){

//Use pantheios::log_xxx() or pantheios::log(xxx, ) with xxx is severity level

try
{
pantheios::log(pantheios::debug, "Entering main(", pantheios::args(argc, argv, pantheios::args::arg0FileOnly), ")");
pantheios::log_DEBUG("debug");
pantheios::log_INFORMATIONAL("informational");
pantheios::log_NOTICE("notice");
pantheios::log_WARNING("warning");
pantheios::log_ERROR("error");
pantheios::log_CRITICAL("critical");
pantheios::log_ALERT("alert");
pantheios::log_EMERGENCY("emergency");

return 1;
}
catch(std::bad_alloc&){
pantheios::log_ALERT("out of memory");
}
catch(std::exception& x){
pantheios::log_CRITICAL("Exception: ", x);
}
catch(...){
pantheios::puts(pantheios::emergency, "Unknown error");
}

return 2;
}


In order to compile this program, we use the following makefile

#########################
#NOTE:
#The core lib is essential part
#We use fe.all front-end lib so we can log with all severity levels
#We use stock fprintf back-end so we link to be.fprintf and bec.fprintf lib
#Util lib may be needed so we link to it
#########################
test.exe: test.o
g++ -o test.exe test.o -L$(FASTFORMAT_ROOT)/lib \
-lpantheios.1.core.gcc42\
-lpantheios.1.be.fprintf.gcc42 -lpantheios.1.bec.fprintf.gcc42\
-lpantheios.1.fe.all.gcc42 -lpantheios.1.util.gcc42

test.o: test.c
g++ test.c -c -I$(FASTFORMAT_ROOT)/include -I$(STLSOFT)/include
clean:
rm test.o test.exe

There are many other useful features introduced by Pantheios, this writing is just basic one. You should refer to Pantheios main page for more tutorial.

Saturday, February 6, 2010

06Feb2010 - IPS OSA Consideration

In X-IPS, we should not develop OSA Gateway (Service Capability Server) in this project. The reasons are the lack of human resource and OSA SCS should be developed by headquarters in order to provide full Service Capability Features which point to Xener's network functional entities.

Otherwise, if we decide to develop our own one, from my point of view, we just can develop Presence Server's Service Capability Feature.

When buying fulled-IMS packages to certain Network Operator, we could associate Presence Server as free. Another server such as RLS, XDMS, Content Server, PNA, OSA SCS will be optional to customers if they want to buy.

Tuesday, April 21, 2009

Integrate Sailfin and OpenIMS Core in IPv4

This entry assume that you installed Sailfin and Open IMS Core successfully, you can consult to install Open IMS Core here. In order to install Sailfin, go to Sailfin project homepage and you'll have complete tutorials about this task.
In my machine, I installed both in Ubuntu 8.10 with Bind9:
  • Open IMS Core, IP address: 192.168.11.19
  • Sailfin, IP address: 192.168.11.18
  1. Configure DNS in Sailfin machine
- Modify /etc/resolv.conf, add this lines:

nameserver 192.168.11.18
search ims.fet.hut
domain ims.fet.hut

Replace "ims.fet.hut" with your IMS domain name respectively.

- In /etc/bind/ folder, create new zone file named openims-sailfin.dnszone with contents:

$ORIGIN ims.fet.hut
$TTL 1W
@ 1D IN SOA ns.ims.fet.hut. root.ims.fet.hut. (
2009041201 ; serial
3H ; refresh
15M ; retry
1W ; expiry
1D ) ; minimum

1D IN NS ns.ims.fet.hut.
ns 1D IN A 192.168.11.18

ims.fet.hut. 1D IN A 192.168.11.19
pcscf 1D IN A 192.168.11.19
icscf 1D IN A 192.168.11.19
scscf 1D IN A 192.168.11.19
hss 1D IN A 192.168.11.19

sailfin1.ims.fet.hut. 1D IN A 192.168.11.18

_sip 1D SRV 0 0 6060 scscf
_sip._udp 1D SRV 0 0 6060 scscf
_sip._tcp 1D SRV 0 0 6060 scscf

_sip._udp.ims.fet.hut. 1D IN SRV 1 0 5060 sailfin1.ims.fet.hut.
_sip._tcp.ims.fet.hut. 1D IN SRV 1 0 5060 sailfin1.ims.fet.hut.
_sips._tcp.ims.fet.hut. 1D IN SRV 1 0 5060 sailfin1.ims.fet.hut.
_sips._udp.ims.fet.hut. 1D IN SRV 1 0 5060 sailfin1.ims.fet.hut.

ims.fet.hut. 1D IN NAPTR 10 50 "s" "SIP+D2U" "" _sip._udp.ims.fet.hut.
ims.fet.hut. 1D IN NAPTR 20 50 "s" "SIP+D2T" "" _sip._tcp.ims.fet.hut.

- In /etc/bind/named.conf.local, add the following lines:

zone "ims.fet.hut" IN {
type master;
file "openims-sailfin.dnszone";
notify no;
allow-update {none;};
};

- Restart bind9:
#/etc/init.d/bind9 restart

- Add following contents in SAILFIN_HOME/domains/domain1/config/domain.xml:
- Run Sailfin:

#cd SAILFIN_HOME/bin
#./asadmin start-domain domain1
#./asadmin start-dataabase
#./asadmin
asadmin> set --host sailfin1.ims.fet.hut server-config.sip-container.external-address=sailfin1.ims.fet.hut
Please enter the admin user name> admin
Please enter the admin password>adminadmin

- That's all with Sailfin machine. After that, sailfin machine has domain name and Contact header is "sailfin1.ims.fet.hut".
Eg: REGISTER message from User equipment via P-CSCF, S-CSCF to Sailfin has Contact:"scscf.ims.fet.hut". Sailfin accept this Register and response with 200 OK has Contact:"sailfin1.ims.fet.hut" via S-CSCF, P-CSCF to User.

2. Configure DNS in Open IMS machine

- Add to /etc/bind/open-ims.dnszone file in IMS machine the following:

sailfin 1D IN A 192.168.11.18
c2d 1D IN A 192.168.11.18

- Restart DNS server in this machine
# /etc/init.d/bind9 restart

- Configure FHoSS to add new application server, point to sailfin. You can use CallSetup application in SAILFIN_HOME/samples/sipservlet/ as an application for IMS.


- You must modify CallSetup a little to work with IMS. Then you can use callsetup service with IMS client like UCT IMS client, OpenIC lite or Mercuro... normally. That's so cool!

NgocSon,